|
|
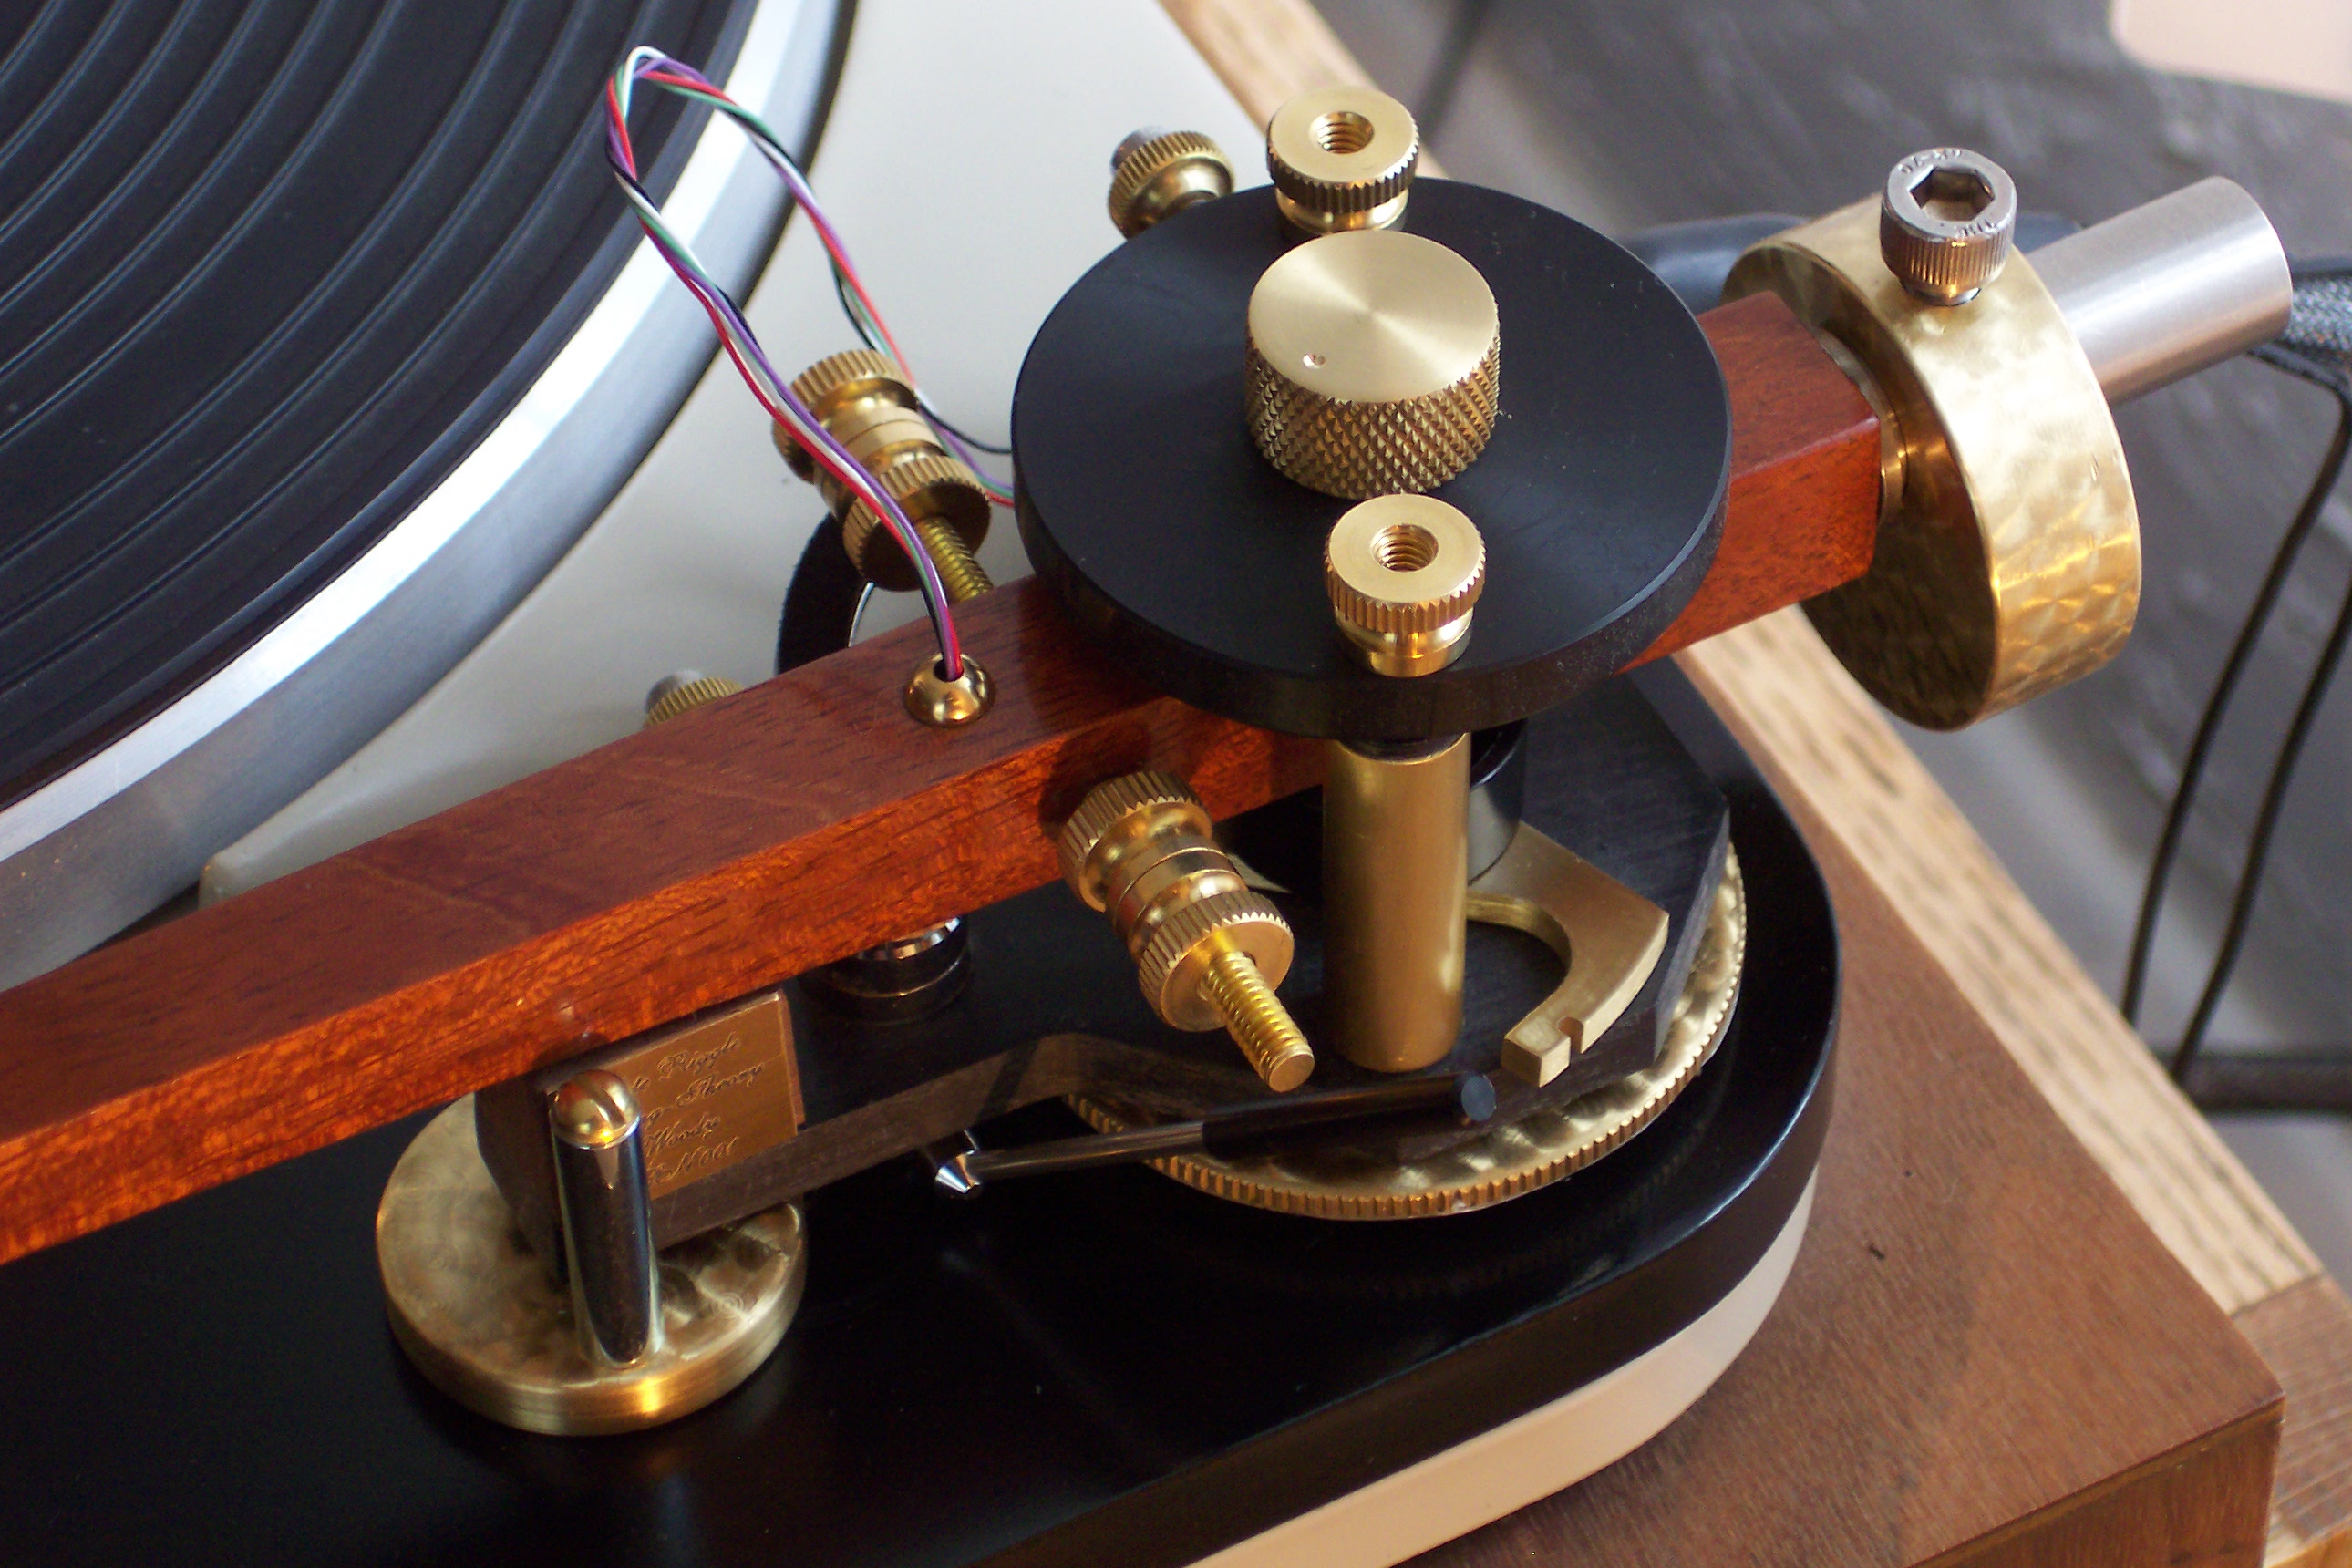
Woody Azimuth Adjustment Unipivot
tonarms come in constrained and unconstrained versions. VPI arms, for instance, are unconstrained. Nottingham, Durand, and
Woody arms are constrained. Constrained
unipivot arms have a snubber system to limit how far the arm can rock about its axis. Constrained unipivot arms handle much
like a gimbal bearing arm. Nottingham
constrained unipivot arms use some kind of clever nylon monofilament tether to achieve the snubbing function. I have not attempted
to figure out the details. Durand constrained unipivot arms use a lateral beam that bears lightly on a horizontal rail to achieve
the snubbing function. The Woody uses an inverted u channel under the armwand,
just below the pivot, with its axis parallel to the armwand axis. The inverted u loosly engages a pin associated with the
lower platform, which is machined integrally within a small cup. I realized that if I moved the pin/cup from side to side,
with a simple lever, I could accomplish azimuth adjustment on the fly. I also realized that with viscous damping oil in the
cup, the inverted u would engage the oil and provide damping. Also, in cases of imperfect lateral balance the oil would lubricate
the interaction between the inverted u and the pin. So the Woody is a constrained unipivot arm where the snubber system 1) snubs, 2) is used to adjust azimuth,
and 3) is used as a damper. This is three birds with one stone. With unconstrained unipivot arms, the user generally rotates the counterweight
to get the preferred azimuth adjustment. Some unconstrained unipivot arms, including the Woody, use a lateral balancing
beam as well, providing another way to trim lateral balance. With constrained unipivot arms not having lateral adjustment built into the snubbing system, the Nottingham
arms for example, general practice is to balance the arm so that the snubber is not active during record playback. With an
arm like this, azimuth must be addressed at the headshell. With the Woody constrained unipivot arm, I realized that azimuth could be adjusted by moving the pin of the
snubber. Unfortunately, perfection would require lateral balancing after azimuth adjustment, to avoid friction associated
with the snubber being active. But what if we needed to make only small adjustments to azimuth, with relatively light contact
between the snubber elements? Calculations indicated that snubber friction would be relatively insignificant for small azimuth
changes. Remember that there are some dynamics involved during record play, and that we might benefit from what is known as
squeeze film lubrication from the oil between the pin and the inverted u. With the Woody I have found that the user gets glorious sound without being
excessively preoccupied with perfect lateral balance after small azimuth changes. At a minimum, we do want to get close to correct lateral balance. We can
use rotation of the counterweight to get lateral balance. In the owner's manual I suggest coarse adjustment of lateral
balance with the counterweight, and fine lateral balance with the balance beam. The balance beam was included so that the
user can adjust lateral balance with minor effect upon tracking force. In practice however, I have found that I can do the
entire balancing operation with just the counterweight. Thus the balance beam is somewhat vestigial. I leave the balance beam
in the product design to satisfy those who seek theoretical perfection. I think the setup sequence should be: 1) set VTAF adjuster wheel so that
1/4 inch of adjuster screw threads are exposed above the wheel, 2) install cartridge (probably with 20 mil shim to get cartridge
low in the rear), 3) adjust overhang, 4) do preliminary VTF setting, 5) put stylus on record, check to see if arm wand is
level, and cartridge is slightly low in the rear, if so, proceed. If the arm wand is not level, move the adjuster screw up
or down the tonearm mounting post until the arm wand is approximately level. If the cartridge is not slightly low in the rear, change
the cartridge shim and repeat the steps above, 6) use the Azimuth on the Fly (AZOF) lever to set azimuth so that the cartridge
body is vertical (a flat mirror on the turntable platter will allow the user to align the cartridge body with its image in
the mirror), 7) do alignment, 8) do VTF check and/or adjustment, 9) adjust lateral balance by rotating the counterweight,
10) do final VTF check, using VTF micro adjuster if necessary, 11) adjust anti-skate as discussed in the owner's manual.
Some iteration may be desired, but I think the above sequence can be gone through just once, followed by VTA and
azimuth adjustment on fly. It is not necessary to redo lateral balance after small azimuth corrections. VTF should be checked
after large VTA adjustments.
The best way to use the counterweight for tracking force adjustment is to get close to the balance point,
then lightly finger tighten the counterweight set screw. Additional tracking force adjustments can be made without loosening
the set screw by slightly rotating the counterweight from side to side while moving the counterweight in the
desired axial direction, making repeated tracking force measurements. The tracking force micro adjuster may be useful when
doing final adjustment of tracking force. When tracking force is as desired, rotate the counterweight as required to get correct
lateral balance, and give a firm finger twist to the counterweight thumb screw.
|